The Art of Hopi Blue Corn Piki Bread: A Taste of Tradition and Resilience
In the heart of the American Southwest, amidst the sun-baked mesas and ancient canyons of the Hopi reservation, a culinary tradition endures, carried through generations like a whispered prayer. It is the art of making piki bread, a delicate, paper-thin wafer crafted from blue corn, a staple crop deeply intertwined with the Hopi way of life. More than just food, Hopi blue corn piki bread is a testament to resilience, resourcefulness, and a profound connection to the land.
The journey of piki bread begins long before it reaches the table. It starts with the cultivation of the sacred blue corn, a variety renowned for its vibrant hue, earthy flavor, and nutritional richness. For centuries, the Hopi people have nurtured this crop using traditional dry-farming techniques, relying on the scarce rainfall and their intimate knowledge of the desert ecosystem. The blue corn’s deep roots tap into the earth’s ancient wisdom, and its kernels, when ground into a fine meal, hold a unique energy that translates into the exquisite taste and texture of piki bread.
The process of making piki bread is a labor of love, a ritualistic practice passed down from elder women to younger generations. It demands patience, precision, and a deep understanding of the ingredients and the subtle shifts in the environment. Unlike the leavened breads common in other cultures, piki is unleavened, its lightness and crispness achieved through a masterful technique of thin batter spreading and rapid cooking.

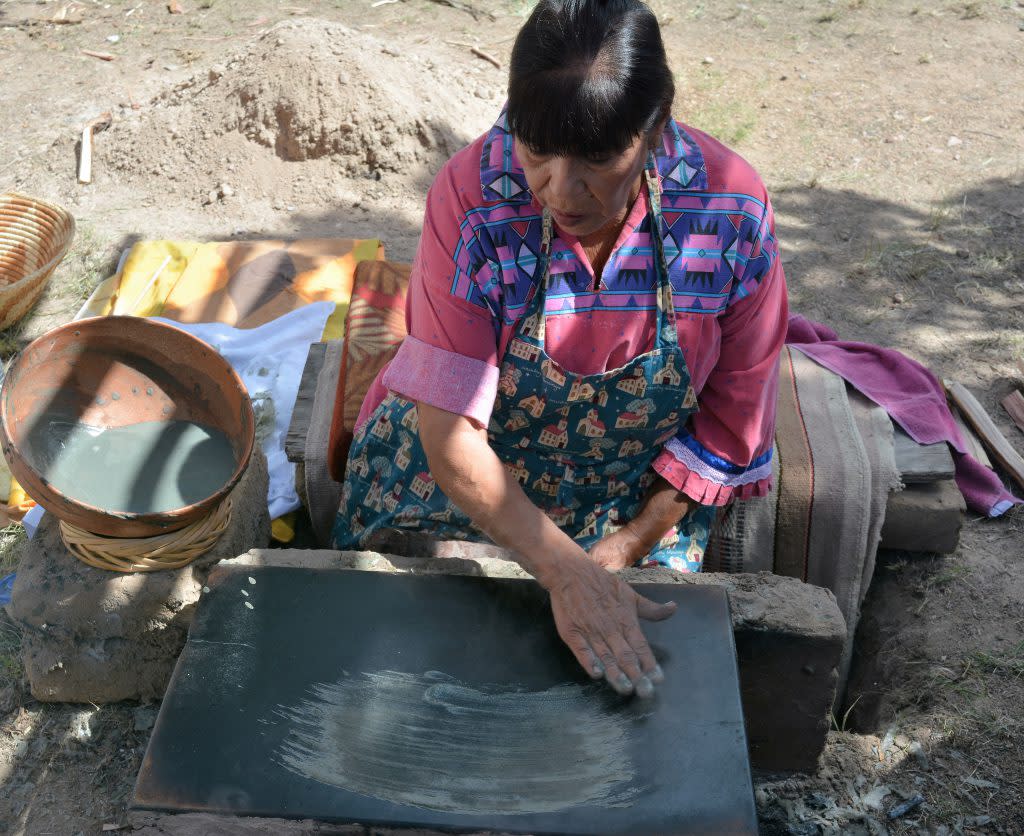
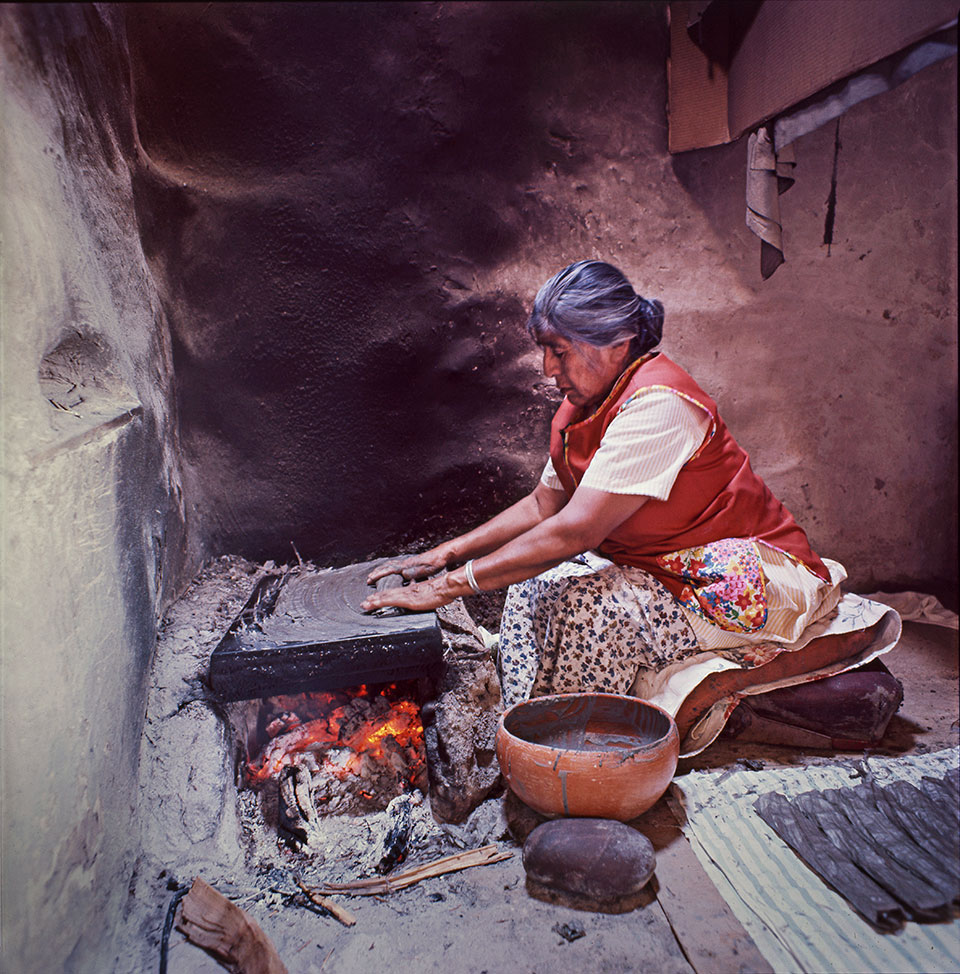
The traditional piki oven, known as a piki (hence the name of the bread), is a marvel of ingenuity. It’s typically constructed from stone or adobe, with a long, narrow cooking surface. A fire is built beneath, creating a consistent, high heat. The oven is meticulously preheated and greased, often with animal fat or vegetable oil, to ensure the piki doesn’t stick.
The batter itself is a simple yet crucial concoction. The finely ground blue cornmeal is mixed with water, sometimes with a pinch of ash from a ceremonial fire, believed to impart a special flavor and aid in the dough’s texture. The consistency is key – it must be thin enough to spread incredibly thinly, almost like a crepe batter, but with enough body to hold its form.
The magic truly happens during the spreading. Using a specially shaped wooden tool, or even their hands, the women artfully spread a whisper-thin layer of batter across the hot surface of the piki oven. This is a swift and practiced movement, requiring years of dedication to perfect. As soon as the batter hits the heat, it begins to cook almost instantaneously. The thinness allows for a rapid evaporation of moisture, resulting in a delicate, almost translucent wafer.
As the piki cooks, it develops tiny bubbles, which contribute to its characteristic crispness. The baker then skillfully flips the wafer to cook the other side, a process that takes mere seconds. Once cooked, the piki is carefully removed from the oven and stacked, still warm, forming a beautiful pile of blue-hued bread. The cooling process allows the piki to become incredibly crisp and brittle, shattering with a satisfying crunch when broken.
The flavor of Hopi blue corn piki bread is as unique as its appearance. It’s subtly sweet, with a distinct nutty and earthy undertone from the blue corn. There’s a purity to its taste, unadulterated by heavy seasonings, allowing the inherent quality of the corn to shine through.
Traditionally, piki bread was made in large batches and stored for extended periods, serving as a vital food source during long journeys or lean times. It was a portable, energy-rich food that sustained the Hopi people through their daily lives and significant ceremonies.
Today, while the traditional methods are still practiced and revered, the art of piki bread making faces challenges. The demand for time-consuming, traditional crafts can be difficult to meet in a modern world. However, the dedication of Hopi women and a growing appreciation for indigenous foods are ensuring its survival. You can sometimes find piki bread at cultural events, artisan markets on the reservation, or through direct orders from Hopi families.
The act of making and sharing piki bread is deeply communal. It’s a time for storytelling, for passing down knowledge, and for strengthening family bonds. When you eat piki bread, you’re not just consuming a food; you’re tasting history, experiencing the resilience of a people, and connecting with the spirit of the Southwest.

The vibrant blue of the corn, the delicate texture, and the earthy flavor all speak to a profound connection with the land. Hopi blue corn piki bread is a culinary masterpiece, a living piece of cultural heritage, and a reminder of the enduring power of tradition in a rapidly changing world. It’s an invitation to slow down, to appreciate the simplicity, and to savor a taste that has nourished generations.
Hopi Blue Corn Piki Bread Recipe (Traditional Style)
This recipe aims to replicate the essence of traditional Hopi blue corn piki bread. It requires practice and a good understanding of batter consistency and cooking technique.
Yields: Approximately 20-30 thin piki wafers
Prep time: 30 minutes (plus time for corn grinding if not using pre-ground meal)
Cook time: 1-2 minutes per wafer
Ingredients:
- 1 cup finely ground Hopi Blue Cornmeal: This is the most crucial ingredient. Ideally, use cornmeal ground from authentic Hopi blue corn. If not available, use the finest grind of blue cornmeal you can find.
- 1 ½ to 2 cups Water: The exact amount will depend on the fineness of your cornmeal. You are aiming for a very thin, pourable batter.
- Pinch of Salt (optional): Traditionally, salt might not be used, or a very small amount. Some believe a pinch of ceremonial ash can be added for flavor, but this is advanced and specific to Hopi traditions.
- Fat for greasing: Traditionally, animal fat (like lard) was used. Vegetable oil or a neutral cooking oil can also be used.
Equipment:
- Piki Oven (traditional stone or adobe oven): This is the ideal, but very difficult to replicate outside of the Hopi reservation.
- Alternative Cooking Surface: A very hot, flat griddle (cast iron is excellent) or a flat, non-stick pan will be necessary for a home kitchen.
- Wooden Spreading Tool (traditionally a flat, shaped piece of wood): You can improvise with a flat, flexible spatula or even use the back of a spoon, but a specialized tool is best for achieving the thinness.
- Small bowl or ladle for batter
- Spatula or thin, flexible metal tool for flipping
Instructions:
1. Prepare the Batter:
- In a medium bowl, combine the finely ground Hopi blue cornmeal and a pinch of salt (if using).
- Gradually add the water, whisking continuously. Start with 1 ½ cups and add more as needed. You are aiming for a batter that is very thin, much thinner than pancake batter. It should be pourable and spreadable. It should be the consistency of heavy cream or a thin crepe batter.
- Let the batter rest for about 10-15 minutes. This allows the cornmeal to absorb the water and helps develop the texture. Whisk again before cooking, as the cornmeal may settle.
2. Preheat Your Cooking Surface:
- If using a traditional Piki Oven: Build a fire beneath the oven and allow it to heat thoroughly. This process is highly skilled and takes time to achieve the right, consistent heat. The cooking surface should be hot but not scorching, allowing the batter to spread before setting.
- If using a Griddle or Pan: Heat your griddle or pan over medium-high heat. It needs to be quite hot. To test if it’s ready, flick a few drops of water onto the surface; they should sizzle and evaporate quickly.
3. Grease the Cooking Surface:
- Traditional Piki Oven: The oven surface is carefully greased.
- Griddle/Pan: Lightly grease your hot griddle or pan with your chosen fat. You don’t want excess oil, just a thin coating. Wipe off any excess with a paper towel.
4. The Spreading Technique (The Art of Piki):
- This is the most challenging part and requires practice.
- Using your spreading tool (or improvised tool), scoop a small amount of batter (about 1-2 tablespoons, depending on the size of your cooking surface).
- Quickly and evenly spread the batter across the hot cooking surface in a single, very thin layer. Aim for a translucent, paper-thin wafer. The goal is to cover the surface without leaving thick spots.
- If using a traditional piki oven, this is done with great speed and dexterity.
5. Cooking the Piki:
- The piki will cook very quickly, likely within 30 seconds to 1 minute.
- Watch for small bubbles to form on the surface and for the edges to start to firm up.
- Carefully slide your spatula or thin tool underneath the piki and flip it over.
- Cook the other side for another 15-30 seconds, just until set.
6. Removing and Stacking:
- Gently remove the cooked piki from the griddle/pan.
- Immediately stack the warm piki on a plate or a clean surface. The residual heat and moisture from the stacked piki will help them soften slightly before they cool and become crisp.
7. Cooling and Serving:
- Allow the stacked piki to cool completely. As they cool, they will become very crisp and brittle.
- Once cooled, the piki bread is ready to be broken into pieces and enjoyed.
Tips for Success:
- Batter Consistency is Key: If the batter is too thick, the piki will be tough. If it’s too thin, it will be difficult to spread and may tear. You may need to adjust the water slightly with each batch.
- Heat Control: Maintaining a consistent, high heat is crucial. If the griddle is too cool, the piki will not cook properly. If it’s too hot, it will burn before you can spread it.
- Practice Makes Perfect: Don’t be discouraged if your first attempts aren’t perfect. The art of piki making is honed over time and with repetition.
- Storage: Piki bread is best stored in an airtight container at room temperature. It will remain crisp for several days.
Enjoy this taste of tradition and the unique flavor of Hopi blue corn!


